Plumbing · 20 minutes · Free
How To Find and Test Your Main Water Shutoff
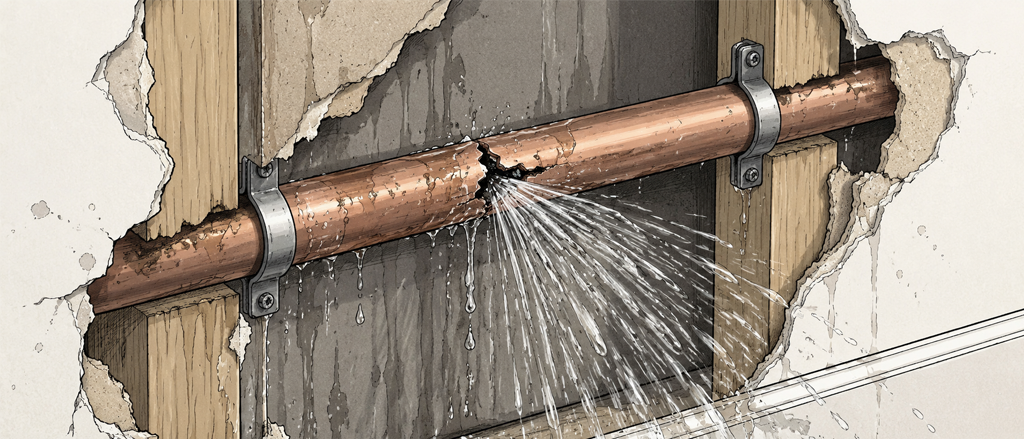
Knowing where your main water shutoff is — and confirming it actually works — is one of the most important things a homeowner can do. A burst pipe, failed supply line, or overflowing appliance can dump dozens of gallons per minute into your home. The difference between a minor incident and tens of thousands of dollars in water damage is often how fast you can close that valve.
-
Understand Why This Matters
Most homeowners discover they don't know where their shutoff is during a crisis — exactly the wrong time to find out. A standard supply line can release 6–8 gallons per minute. A pinhole in a copper pipe can go unnoticed for days.
- A burst washing machine hose is one of the most common sources of catastrophic home water damage.
- Toilets, dishwashers, and refrigerator ice lines all have individual shutoffs — but they won't help if the main line itself is breached.
- Knowing the main shutoff location is something every person in your household should have memorized.
Tip: Before you start: if you've never tested your main shutoff, don't do it during a drought or if you have a pressure-sensitive system (like a whole-house water softener) without reading those manufacturer notes first. Testing is quick and safe in virtually all standard homes.
-
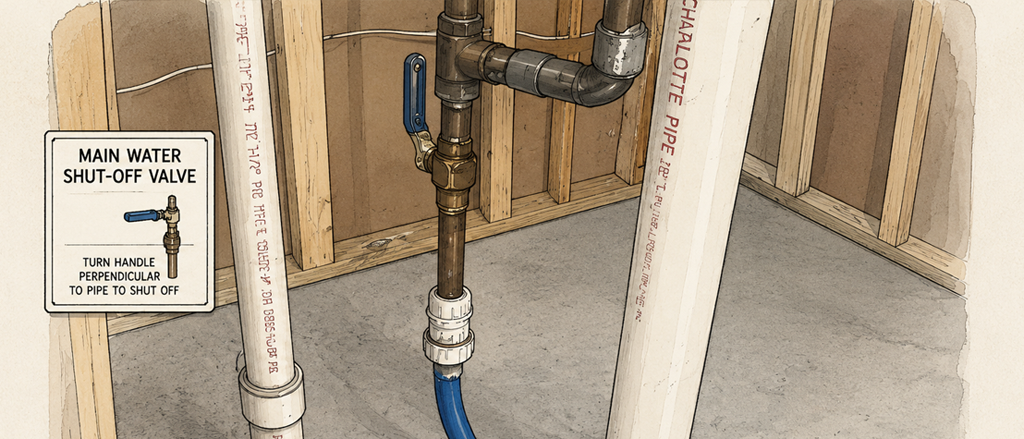
Find the Shutoff Inside the House
The main shutoff is almost always located where the water supply line enters the house. Check these locations in order:
- Basement — look on the front-facing or street-facing wall, near floor level. The pipe usually comes through the foundation wall within a foot or two of where the exterior hose bib is located.
- Crawl space — near the foundation where the line penetrates the wall. Bring a flashlight.
- Utility closet or mechanical room — often near the water heater or furnace. The shutoff may be on the same pipe chase.
- Under the kitchen sink — in homes on a slab with no basement or crawl space, the main line sometimes enters at the kitchen. Look for a larger pipe than the standard hot/cold supply lines to the faucet.
Tip: The pipe will be 3/4" or 1" diameter — noticeably larger than the 1/2" supply lines that branch off to fixtures. The shutoff valve will be the first valve on that pipe after it enters the house.
-
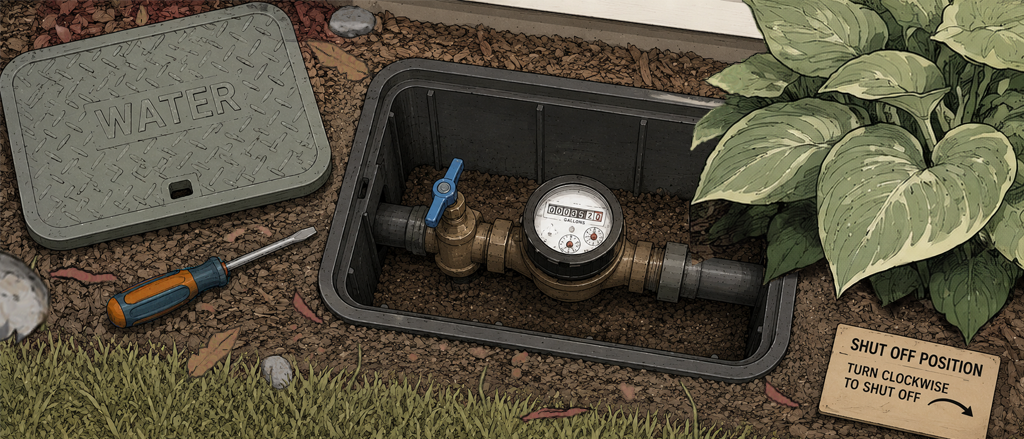
Check the Meter Box at the Street (Backup Location)
If you can't find an interior shutoff — which is common in older homes, homes built on a slab, or homes in warm climates where the supply line enters through the ground rather than a wall — there is always a shutoff at the water meter.
- The meter box is a rectangular concrete or plastic box set into the ground near the street or sidewalk in front of your property.
- Open the lid — a flathead screwdriver in the notch lifts it easily — and look for a valve on the house side of the meter (not the street side, which belongs to the utility company).
- This valve is yours. In an emergency, closing it will stop all water to the house.
Note: The utility company also has a shutoff at the street side of the meter, but that's their valve to operate. Use the house-side valve for emergencies and routine testing.
-
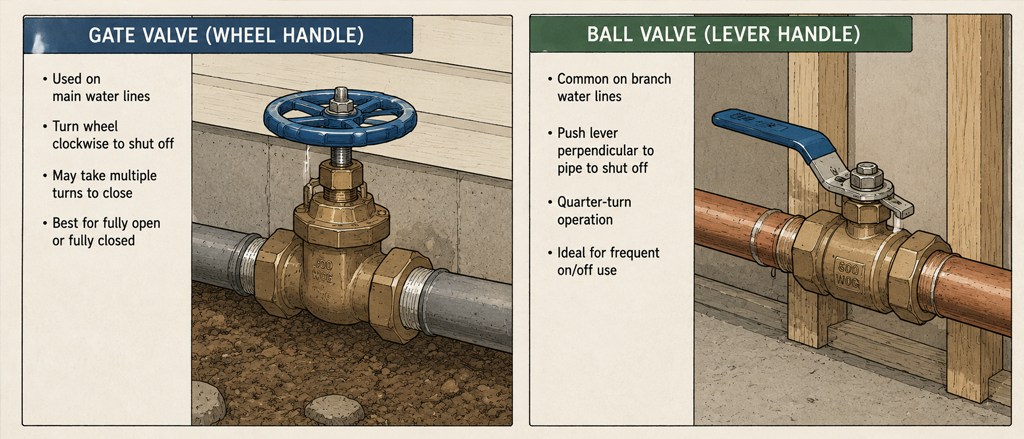
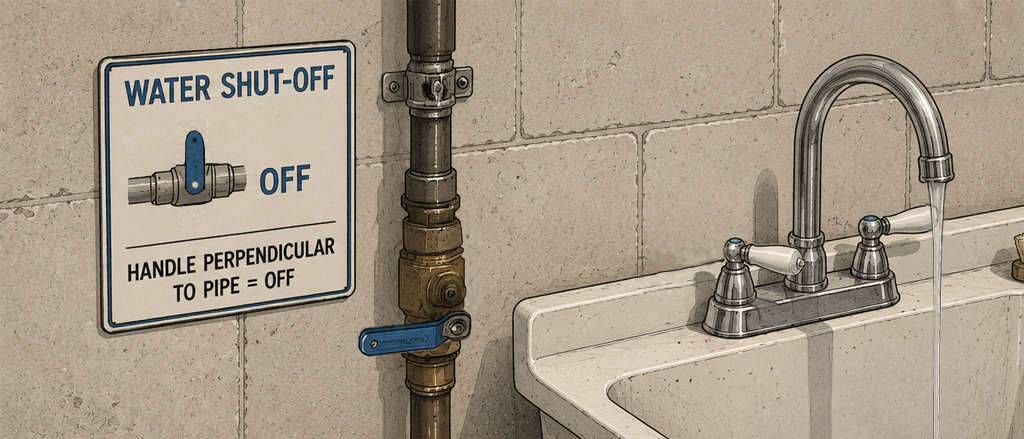
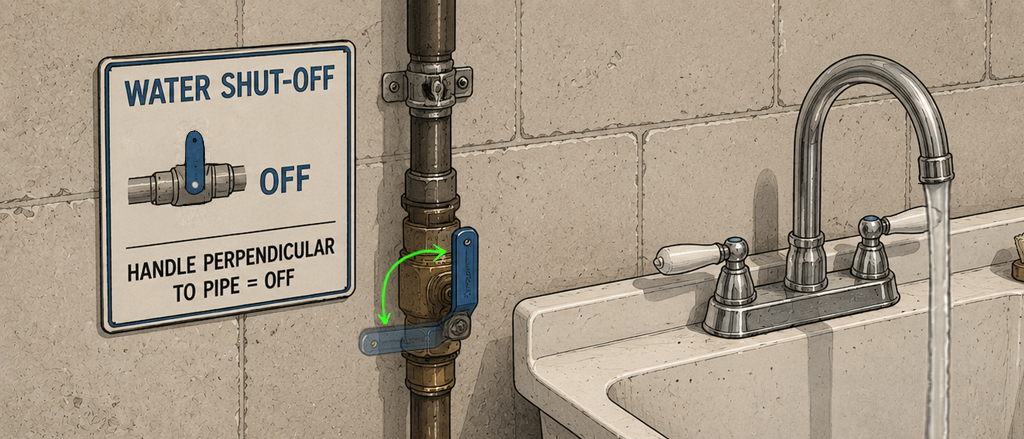
Identify Your Valve Type
Once you find the valve, you need to know how to operate it under pressure. There are two common types:
- Gate valve — round, multi-spoke wheel handle. Turn clockwise (righty-tighty) to close; counter-clockwise to open. Takes several full rotations. Common in homes built before the 1980s. Reliable when new, but the rubber seat wears over time and they can fail to fully close.
- Ball valve — lever handle that aligns with the pipe when open. Rotate 90° (one quarter-turn) so the lever sits perpendicular to the pipe to close. One motion fully closes it — far better in an emergency. Standard in homes built in the last 30 years.
Tip: If you have an older gate valve that shows visible corrosion or a pitted wheel, consider having a plumber replace it with a ball valve. The upgrade costs $150–$300 and the reliability difference is significant.
-
Test the Valve
Finding the valve is only half the job. You need to know it actually works before you need it.
- Open a cold-water faucet somewhere in the house — a utility sink, laundry tub, or outdoor hose bib is ideal (to avoid draining a sink you're working in).
- Close the main shutoff fully. Water should stop at the open faucet within 5–10 seconds as pressure drops.
- If flow only slows but doesn't stop, the valve is partially failed — common with old gate valves whose rubber seats have worn through. Note this and call a plumber; a leaking shutoff is not a shutoff.
- Once confirmed, reopen the shutoff. The faucet may sputter as air clears the line — that's normal.
Tip: After reopening, check under sinks and around the water heater for any drips. Sudden pressure cycling can sometimes disturb fittings that were barely holding — better to find out now than during an emergency.
-
Exercise the Valve Annually
A valve that hasn't moved in years can seize open from mineral deposits — exactly when you can least afford it. Add this to your annual home maintenance routine:
- Gate valve: Close fully (clockwise until snug — don't over-torque), then open one full rotation back. This leaves the valve ready to close quickly while preventing the stem from galling in the full-open position.
- Ball valve: Close fully (90° turn), then reopen. That's it.
- If the valve is stiff but moves with firm pressure, it's okay — just note that it needs attention.
- If the valve won't move at all, do not force it. Call a plumber to assess whether it can be freed or needs replacement.
Tip: Log the exercise in ManorKeep with the date and a note on how the valve felt. If it gets stiffer year over year, that's a sign to replace it before it seizes completely.
-

Label It and Tell Everyone in the House
Knowing the shutoff location yourself isn't enough if you won't always be home.
- Attach a labeled tag to the valve handle: "MAIN WATER SHUTOFF — TURN RIGHT TO CLOSE" (for a gate valve) or "MAIN WATER SHUTOFF — TURN LEVER SIDEWAYS TO CLOSE" (for a ball valve). Hardware stores sell adhesive labels designed for exactly this.
- Walk every adult in the household to the location and show them how to operate it. Do a dry run.
- If you have a house-sitter, property manager, or AirBnB guests, include the shutoff location in your welcome notes.
- Take a photo and note the location in ManorKeep so it lives in your home's permanent record.
Tip: Write the meter box location too — especially useful if you need to call a plumber and direct them quickly, or if the interior shutoff fails and you need the backup.
Quick Reference
Home maintenance, handled
Know your home before an emergency forces you to
ManorKeep keeps the critical details — shutoff locations, valve conditions, maintenance dates — in one place, always accessible when you need them most.
Join the early access list
Be the first to know when ManorKeep launches — and lock in free early access.
Get notified at launchNo spam. No credit card. Just an update when we're ready.